Adding Comment To Static Site
Update (2025 May): Since writing this article, I’ve switched from Isso to Remark42 for its simpler Docker-based deployment and better maintainability. While the article below describes the Isso setup, I’m now using Remark42 which can be deployed using a simple docker-compose file:
version: "2"
services:
  remark42:
    image: umputun/remark42:latest
    container_name: "remark42"
    restart: always
    environment:
      - REMARK_URL=https://comments.yourdomain.com
      - SITE=your-site-id
    volumes:
      - ./var:/srv/var
    ports:
      - "8080:8080"
In frontend the integration is simple just add the script tag to the page and add the div id to the page where you want the comments to appear.
 // Remark42 initialization
 window.remark_config = {
   host: 'https://comments.yourdomain.com',
   site_id: 'your-site-id',
   components: ['embed'],
   max_shown_comments: 10,
   theme: window.matchMedia('(prefers-color-scheme: dark)').matches ? 'dark' : 'light',
   url: window.location.origin + window.location.pathname,
   page_title: document.title,
   locale: 'en',
   show_email_subscription: false,
   show_rss_subscription: false,
   simple_view: false,
   no_footer: false
 };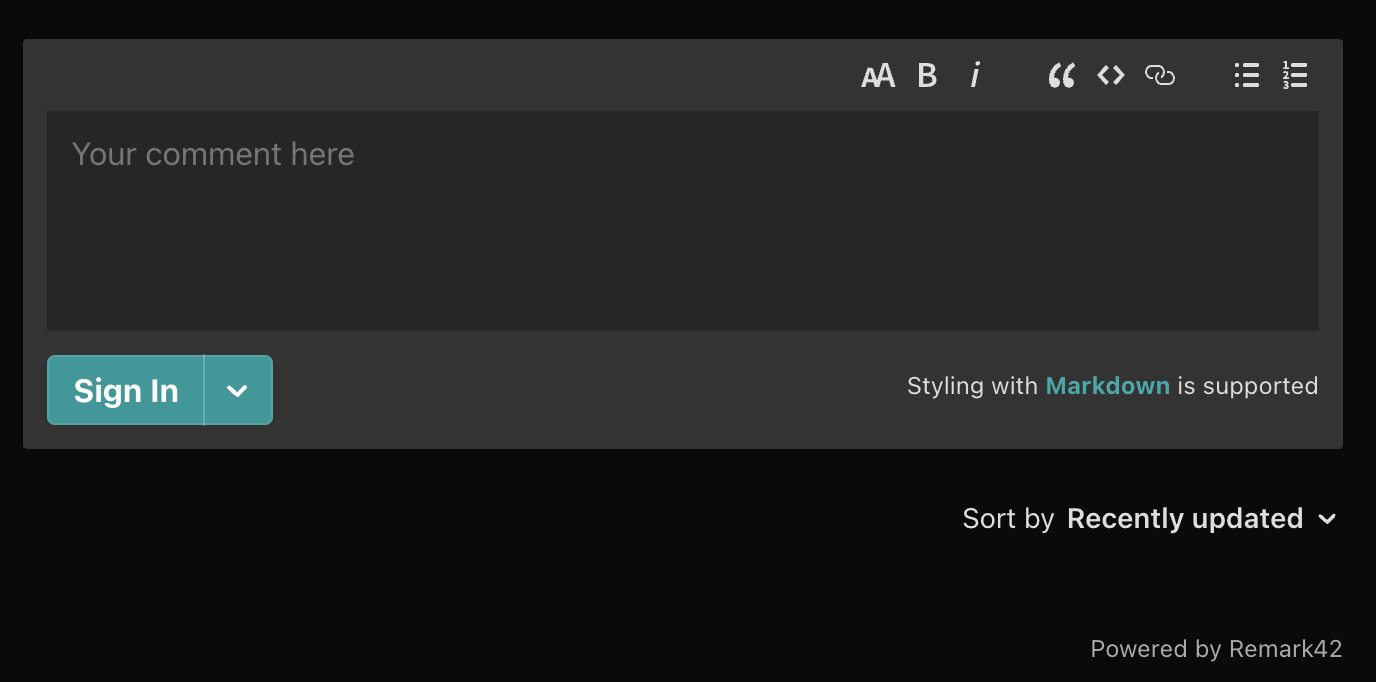
The switch to Remark42 has significantly simplified the maintenance while providing a better user experience. The original article continues below, documenting my initial journey with Isso.
Chapter 1: The Challenge of No Comments on My GitHub Page
My static site, hosted on GitHub Pages, is simple and easy to manage. But there’s a catch – it doesn’t support user comments. You see, static sites, like mine, are straightforward – they show information but don’t let users say anything back.
Why Can’t We Comment?
GitHub Pages, where I host my site, doesn’t allow for fancy stuff happening in the background. No dynamic features or server magic, which means no comments. Comments are like a suggestion box – a way for visitors to speak up, ask questions, or share thoughts. Without them, my site feels a bit like a one-way street.
Why Does It Matter?
Imagine going to a party, but you can only listen to others; you can’t chime in with your thoughts. That’s how my static site felt – missing the fun conversations. Comments are the heart of community building, and without them, my site wasn’t as lively as I wanted it to be.
Making Our Site Talk Back
In the next chapters, I’ll spill the beans on how I tackled this. It’s about finding clever ways to add a touch of interactivity to our otherwise straightforward static site. Let’s turn our silent static pages into a place where people can join the conversation!
Chapter 2: Exploring Commenting Solutions
So, I had this itch to make my GitHub Pages-hosted static site a bit more interactive. The challenge? GitHub Pages doesn’t play nice with dynamic features like comments. Time to explore some solutions!
The Quest for Commenting Solutions
I dove into the vast sea of options to find a commenting solution that suits a static site hosted on GitHub Pages. Here’s what I found:
1. Third-party Comment Platforms
Pros:
- Easy Setup: Like ready-made fishing rods, platforms such as Disqus and Commento are effortless to set up. You just embed their code, and boom, you’re ready to fish!
- Feature-Rich: These platforms often come with a bunch of features – moderation tools, user profiles, and sometimes even analytics.
Cons:
- Third-party Dependencies: Relying on external services means your commenting functionality is tied to their systems. If they have issues, so do you.
- Limited Customization: While they offer customization to some extent, you might not have full control over the appearance and behavior.
- Ads or Fees: Keep in mind that some third-party platforms may display ads on your comments section or require a fee for an ad-free experience.
2. GitHub Issues and Pull Requests
1. Utterances
Pros:
- GitHub Integration: Utterances directly integrates with GitHub Issues, turning each issue into a comment thread.
- Ease of Use: Simple setup process with minimal configuration required.
- No External Dependencies: Relies on GitHub infrastructure, avoiding external dependencies.
Cons:
- Limited Customization: Customization options are somewhat limited compared to self-hosted solutions.
- Public GitHub Repository Requirement: Comments are tied to a public GitHub repository.
- Migration Challenges: Migrating comments to another system can be a bit tricky due to GitHub-centric integration.
2. Staticman
Pros:
- Full Control: Allows for self-hosting, giving you complete control over your comments.
- Customization: Highly customizable, enabling you to tailor the commenting system to your site’s needs.
- Private Repositories: Supports commenting on private repositories.
Cons:
- Technical Complexity: Requires more technical knowledge for setup, especially if opting for self-hosting.
- Maintenance Overhead: Self-hosted instances require regular maintenance and updates.
- Migration Challenges: Moving comments to another platform may pose challenges due to its unique structure.
3. Self-Hosted Solutions
Pros:
- Full Control: Hosting your own comments means you’re the captain of the ship. You decide how things work, look, and function.
- Data Ownership: Your comment data stays on your server, giving you control and ownership.
Cons:
- Technical Complexity: Setting up and maintaining your own commenting system requires technical know-how. It’s like catching your own fish – not everyone’s cup of tea.
- Maintenance Burden: You’re responsible for updates, security, and ensuring everything runs smoothly.
4. Custom-Built Solutions
Pros:
- Tailored to Your Needs: Like crafting your own fishing gear, a custom-built solution fits your site like a glove. You decide what features to include.
- Complete Control: You have the reins. Everything from the design to the functionality is in your hands.
Cons:
- Time-Consuming: Building your own solution takes time. It’s not like buying a ready-made rod; you’re weaving the fishing net from scratch.
- Development Challenges: If you’re not a coding pro, this might be a steep learning curve. Bugs and maintenance become your responsibility.
Decision Time
After weighing these options, I decided to go with a self-hosted solution. In the next chapter, I’ll share the ins and outs of setting it up and how it transformed my static site into an interactive space!
Chapter 3: The Right Solution
After exploring various commenting solutions, I considered a few options for a self-hosted system for my GitHub Pages static site. Here are the options:
-
Isso: An elegant, Python-based commenting server that prioritizes user privacy. Setting up Isso is like choosing a sophisticated fishing rod – it might take some effort, but the results are rewarding.
-
Staticman: A powerful, highly customizable solution that allows for self-hosting. It’s like crafting your own fishing gear, tailored to your site’s unique needs.
-
Remark42: A lightweight, self-hosted comment engine that supports Markdown. Think of it as a versatile fishing rod with a simple design and robust features.
-
Commento: While it offers a hosted version, you can also self-host Commento. It’s akin to having a modular fishing kit – pick the components that suit your needs.
-
Talkyard: A modern, self-hosted solution that combines comments with forum-like features. Think of it as a dynamic fishing rod, capable of handling various types of interactions.
-
Coral Project: An open-source collaboration by Vox Media, The Washington Post, and The New York Times. It offers robust, self-hosted commenting infrastructure. Like having a professional fishing guide, Coral Project provides the expertise to navigate complex comment environments.
After careful consideration, I’ve chosen Isso as the self-hosted solution for my static site. My experience with Python, which is also the language Isso is built upon, makes the setup process more familiar and manageable. Additionally, the fact that Isso is free and open source aligns with my preference for accessible and transparent solutions.
When opting for a self-hosted solution, it’s crucial to select the right cloud provider for optimal performance and reliability. Popular cloud providers include:

Cloud Provider Options
Choosing the right cloud provider is crucial for hosting your self-hosted solution. Here’s why I chose Oracle Cloud:
-
Amazon Web Services (AWS): Robust and scalable, but their free tier doesn’t include a forever-free compute instance.
-
Microsoft Azure: Offers excellent integration, but alas, no eternal compute instances in their free tier.
-
Google Cloud Platform (GCP): Known for data analytics, but the free tier lacks the forever-free compute goodness.
-
DigitalOcean: Simple and user-friendly, but the forever-free compute is missing from their offerings.
-
Oracle Cloud: Ah, Oracle Cloud – Oracle has a free tier. It’s really free. It costs nothing to use. Forever. It’s awesome and you should totally use it.
Chapter 4: Taming the Cloud for Commenting Bliss
Now that the clouds have settled (figuratively speaking), it’s time to delve into the nitty-gritty of implementing and managing our chosen self-hosted commenting solution, Isso, on the Oracle Cloud. This chapter will guide you through the essential steps of setting up your Oracle Cloud instance, deploying Isso, and configuring the frontend to seamlessly integrate it with your static site.

Creating an Oracle Cloud Instance
- Creating an Oracle Cloud Instance: A step-by-step guide to creating your Oracle Cloud instance, ensuring it meets the requirements for hosting Isso. Check the official Creating an Instance for the most up-to-date instructions.
Setting Up Isso with Nginx on Oracle Cloud
Step 1: Connect to Your Oracle Cloud Instance
Use your preferred SSH client to connect to your Oracle Cloud instance. You can obtain the public IP address from your Oracle Cloud Console.
ssh your_username@your_instance_ipStep 2: Update System Packages
Make sure your system packages are up to date.
sudo apt update
sudo apt upgrade
Step 3: Install Isso Dependencies
Install the necessary dependencies for Isso.
sudo apt install python3 python3-pipStep 4: Install Isso
Use pip to install Isso.
sudo pip3 install issoStep 5: Configure Isso
Create a configuration file for Isso and edit it with your preferred text editor.
sudo mkdir /etc/isso
sudo vi /etc/isso/isso.conf
Paste the following sample configuration, adjusting it as needed:
[general]
name=comments
dbpath = /var/lib/isso/comments.db
host = your-website-address.com
max-age= 15m

[server]
listen = http://localhost:1927

[guard]
enabled = true
ratelimit = 2
direct-reply = 3
reply-to-self = false
require-author = false
require-email = false

[markup]
options = strikethrough, superscript, autolink
allowed-elements =
allowed-attributes =

[admin]
enabled = true
password = whateverpasswordyouwant
Save and exit the text editor.
Step 6: Create Isso Service
Create a systemd service file for Isso.
sudo vi /lib/systemd/system/isso.servicePaste the following content:
[Unit]
Description=isso commenting system

[Service]
ExecStart=/home/opc/isso-start.sh


Restart=on-failure
TimeoutSec=1
User=isso

LimitNOFILE=16384
LimitNPROC=16384
LimitLOCKS=16384

NoNewPrivileges=true

[Install]
WantedBy=multi-user.target
create isso-start.sh file
sudo vi isso-start.shPaste the following content:
#!/bin/bash
set -e
export LANG=C.UTF-8
export ISSO_SETTINGS=/home/opc/isso.conf
exec gunicorn -n gunicorn-isso -b 127.0.0.1:1927 --preload -w 4 --log-file /var/log/isso/isso.log isso.dispatch 2>>/var/log/isso/isso.log
Save and exit.
Step 7: Start Isso Service
Start the Isso service and enable it to start on boot.
sudo systemctl start isso
sudo systemctl enable isso
Step 8: Install and Configure Nginx
Install Nginx on your Oracle Cloud instance.
sudo apt install nginxStep 9: Configure Nginx for Isso
Create an Nginx configuration file for Isso.
sudo vi /etc/nginx/sites-available/issoPaste the following Nginx configuration:
server {
    listen 8080;
    server_name your-domain.com;  # Replace with your domain

    location / {
        proxy_pass http://localhost:1927;
        proxy_set_header Host $host;
        proxy_set_header X-Real-IP $remote_addr;
        proxy_set_header X-Forwarded-For $proxy_add_x_forwarded_for;
        proxy_set_header X-Forwarded-Proto $scheme;
    }
}
Enable the site by creating a symbolic link.
sudo ln -s /etc/nginx/sites-available/isso /etc/nginx/sites-enabledTest Nginx configuration and restart the service.
sudo nginx -t
sudo systemctl restart nginx
Step 9: Open Port 8080 and Reload Isso
Ensure that port 8080 is open on your Oracle Cloud instance.
sudo iptables -A INPUT -p tcp --dport 8080 -j ACCEPT
sudo netfilter-persistent save
sudo netfilter-persistent reload
Reload the Isso service.
sudo systemctl restart issoStep 10: Access Isso
Visit your domain or public IP to access Isso through Nginx.
By following these steps, you’ll have successfully set up Isso with Nginx on your Oracle Cloud instance. Adjust configurations according to your preferences and site requirements.
Configuring the Frontend with Isso
- Configuring the Frontend with Isso: Learn how to integrate Isso with your static site frontend. This includes updating your site’s HTML to include Isso comments and configuring Isso to communicate effectively with your site.
Step 1: Locate Your Static Site’s HTML
Locate the HTML file of your static site where you want to add the Isso comments section. This is typically the file responsible for rendering your blog post or content.
Step 2: Insert Isso Script Tag
Within the HTML file, locate the area where you want the comments to appear. Insert the following Isso script tag where you want the comments section to be rendered:
<div id="isso-thread"></div>
<script data-isso='{"target": "#isso-thread"}' src="http://your-isso-server:8080/js/embed.min.js"></script>
Replace "http://your-isso-server:8080" with the actual URL where your Isso server is running. If you’re using the Nginx setup from the previous steps, this would be the domain or IP address of your Oracle Cloud instance.
If you are using Astro just create a astro file like this and add to all the pages
---

---

<script data-isso="https://issocomment.dionsyus.online/comments/" src="https://issocomment.dionsyus.online/comments/js/embed.min.js/"></script>
<div class="post-footer">
    <section id="isso-thread"></section>
</div>
Step 5: Verify Integration
Visit a page on your static site where you added the Isso script tag. You should now see the Isso comments section rendered on the page. Like this
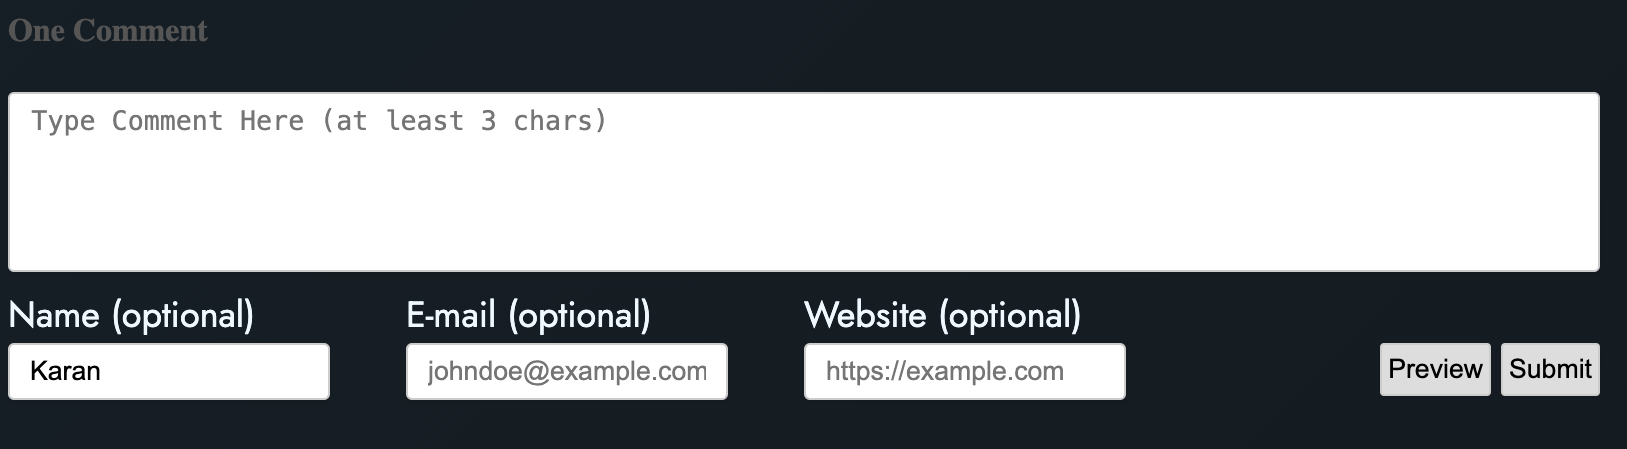
Congratulations! You have successfully integrated Isso with your static site’s frontend. Adjust the styling and placement of the comments section as needed based on your site’s design.
Conclusion
You’ve done it! Your static site is now a lively hub for discussions, thanks to Isso and the cloud. Let’s sum it up:
- Oracle Cloud Setup: Created a cloud space for Isso to live.
- Isso with Nginx: Installed Isso on Oracle Cloud, guarded by Nginx.
- Frontend Harmony: Integrated Isso seamlessly with your site’s frontend.
Now, your site is more than static—it’s buzzing with user engagement. Embracing self-hosted solutions like Isso ensures you have control and privacy.
Cheers to fostering meaningful discussions on your site! Any questions or thoughts? Reach out anytime. Happy commenting!
Comments